For developers
Installation
You can add the CookieConsent.io consent popup by adding the script below between the <head> html tags. Replace the 000000000000-0000-0000-0000-000000000000 with the ID provided to you in the support e-mail.
<script type="text/javascript" src="https://edge.cookieconsent.io/prod/js/000000000000-0000-0000-0000-000000000000.js?hidden=false&backdrop=false&position=center&marketing=false&analytics=true&google_consent_mode=true"></script>You can configure certain options by adding query parameters to the source file. These options override the default value entered in the manager. The following options are available:
hidden
Hide or show the cookie consent. Possible values are ‘true’ or ‘false’.
force
Always show the cookie consent. Possible values are ‘true’ or ‘false’.
backdrop
Hide or show the backdrop. Possible values are ‘true’ of ‘false’.
backdrop_color
Determine the color of the backdrop. Value must be a hexidecimal color code (for example #000000).
position
Determines the position of the cookie consent. Possible values are ‘top’, ‘center’ of ‘bottom’.
font
Determine the font family of the consent. Font family must be made available in the browser (for example Verdana).
button1Color
Determine the color of the ‘Allow all’ button. Value must be a hexidecimal color code (for example #1ab530).
button2Color
Determine the color of the ‘Cookie settings’ button. Value must be a hexidecimal color code (for example #b1b3b1).
button3Color
Determine the color of the ‘Save settings’ button. Value must be a hexidecimal color code (for example #000000).
pillColor
Determine the color of the ‘Pill’ buttons when enabled. Value must be a hexidecimal color code (for example #000000).
consentHeight
Determine the consent height in pixels. Value must be an integer.
hiddenHorizontalRule
Hide the horizontal rule. Possible values are ‘true’ of ‘false’.
headerSize
Determine the font size of the header in pixels. Value must be an integer.
subheaderSize
Determine the font size of the subheader in pixels. Value must be an integer.
bodySize
Determine the font size of the body text in pixels. Value must be an integer.
alwaysActiveSize
Determine the font size of the ‘Always active label’ in pixels. Value must be an integer.
transformTitle
Transform the text formatting of the title. Possible values are none, capitalize, lowercase or uppercase.
functional
Hide or show the option to activate ‘Functional cookies’.
analytics
Hide or show the option to activate ‘Statistics cookies’.
marketing
Hide or show the option to activate ‘Marketing cookies’.
functionalDefaultChecked
Default activate the ‘Functional cookies’ option.
analyticsDefaultChecked
Default activate the ‘Analytics cookies’ option.
marketingDefaultChecked
Default activate the ‘Marketing cookies’ option.
google_consent_mode
Activate or deactivate Google Consent Mode.
Installation Google Tag Manager
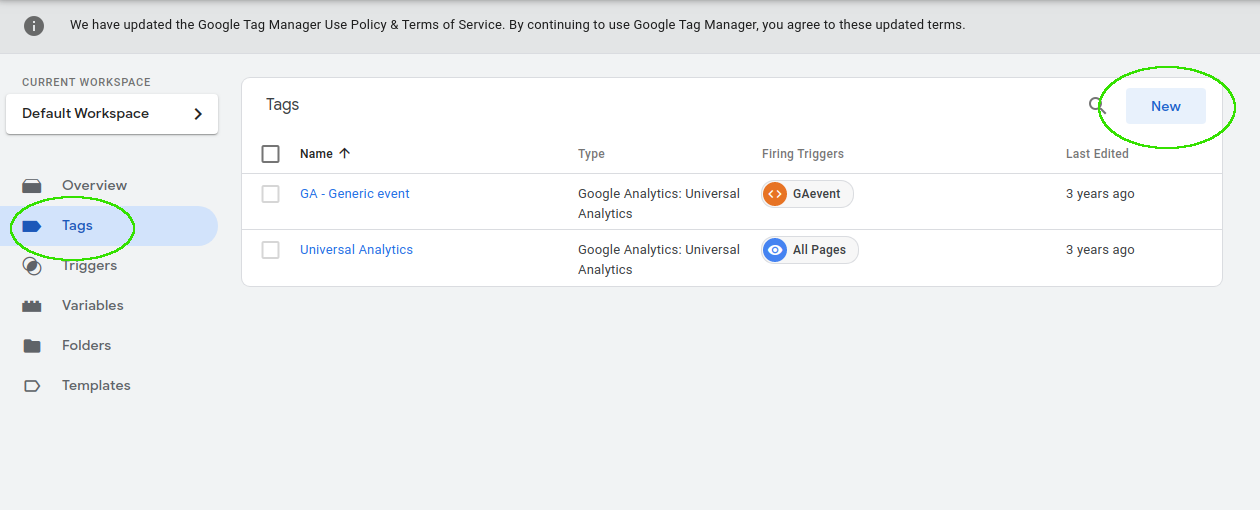
To install our cookie consent popup on your website, you can easily add it as a tag within Google Tag Manager. To do this, click on the tags button and press “New”.

Give your tag a name (e.g. Cookieconsent.io – All pages). Then press the “Explore More Tag Types in the Community Template Gallery” button.
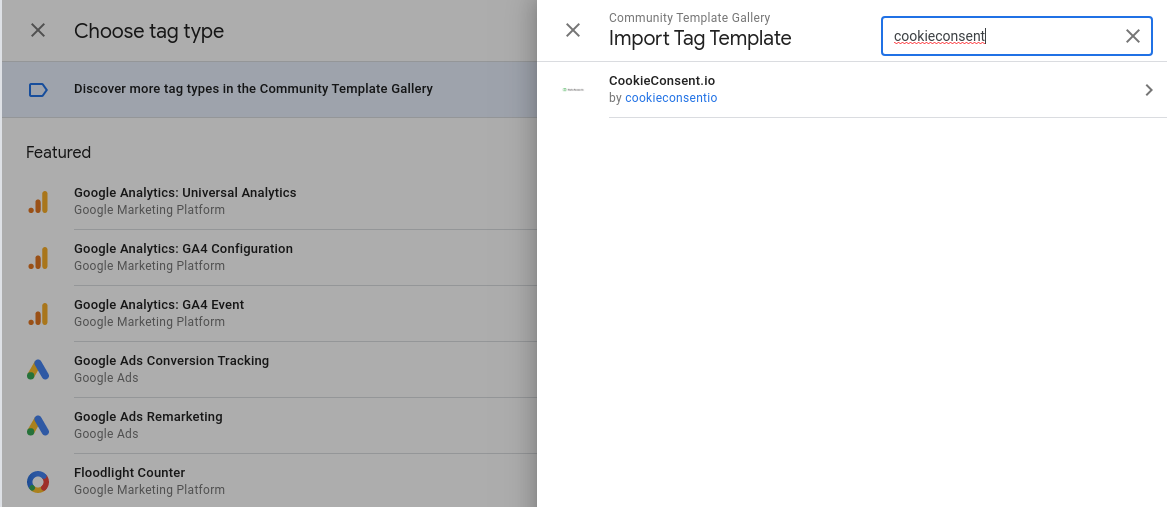

Then search for “cookieconsent.io”. Select CookieConsent.io and click “Add to Workspace”.

Then click the “Add” button.
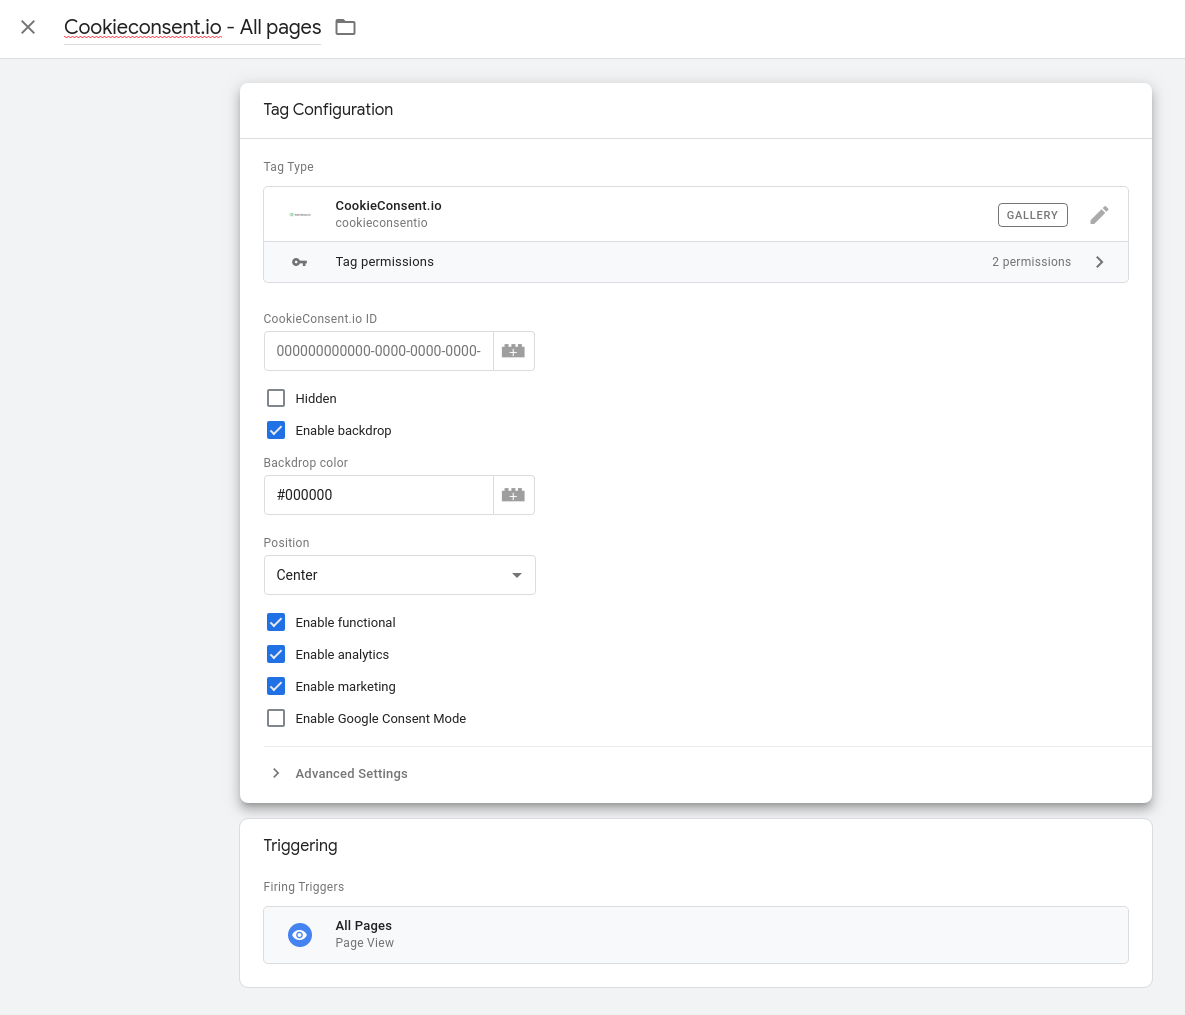
In the next screen you will see all the settings of the tag. At CookieConsent.io ID, enter the ID that we have sent you by e-mail. Next, at Triggers, select the option “All pages”. That way the popup is shown on every page.
You can then configure your cookie consent popup. The following options are available:
hidden
Hide or show the cookie consent. Possible values are ‘true’ or ‘false’.
backdrop
Hide or show the backdrop. Possible values are ‘true’ or ‘false’.
backdrop_color
Determine the color of the backdrop. Value must be a hexidecimal color code (for example #000000).
position
Determines the position of the cookie consent. Possible values are ‘top’, ‘center’ or ‘bottom’.
font
Determine the font family of the consent. Font family must be made available in the browser (for example Verdana).
button1Color
Determine the color of the ‘Allow all’ button. Value must be a hexidecimal color code (for example #1ab530).
button2Color
Determine the color of the ‘Cookie settings’ button. Value must be a hexidecimal color code (for example #b1b3b1).
button3Color
Determine the color of the ‘Save settings’ button. Value must be a hexidecimal color code (for example #000000).
pillColor
Determine the color of the ‘Pill’ buttons when enabled. Value must be a hexidecimal color code (for example #000000).
consentHeight
Determine the consent height in pixels. Value must be an integer.
hiddenHorizontalRule
Hide the horizontal rule. Possible values are ‘true’ of ‘false’.
headerSize
Determine the font size of the header in pixels. Value must be an integer.
subheaderSize
Determine the font size of the subheader in pixels. Value must be an integer.
bodySize
Determine the font size of the body text in pixels. Value must be an integer.
alwaysActiveSize
Determine the font size of the ‘Always active label’ in pixels. Value must be an integer.
transformTitle
Transform the text formatting of the title. Possible values are none, capitalize, lowercase or uppercase.
functional
Hide or show the option to activate ‘Functional cookies’.
analytics
Hide or show the option to activate ‘Statistics cookies’.
marketing
Hide or show the option to activate ‘Marketing cookies’.
functionalDefaultChecked
Default activate the ‘Functional cookies’ option.
analyticsDefaultChecked
Default activate the ‘Analytics cookies’ option.
marketingDefaultChecked
Default activate the ‘Marketing cookies’ option.
google_consent_mode
Activate or deactivate Google Consent Mode.
Once you are done, hit the Save button. In this way, the consent is saved and will be displayed on your website after publication of the workspace.
Google Tag Manager Datalayer
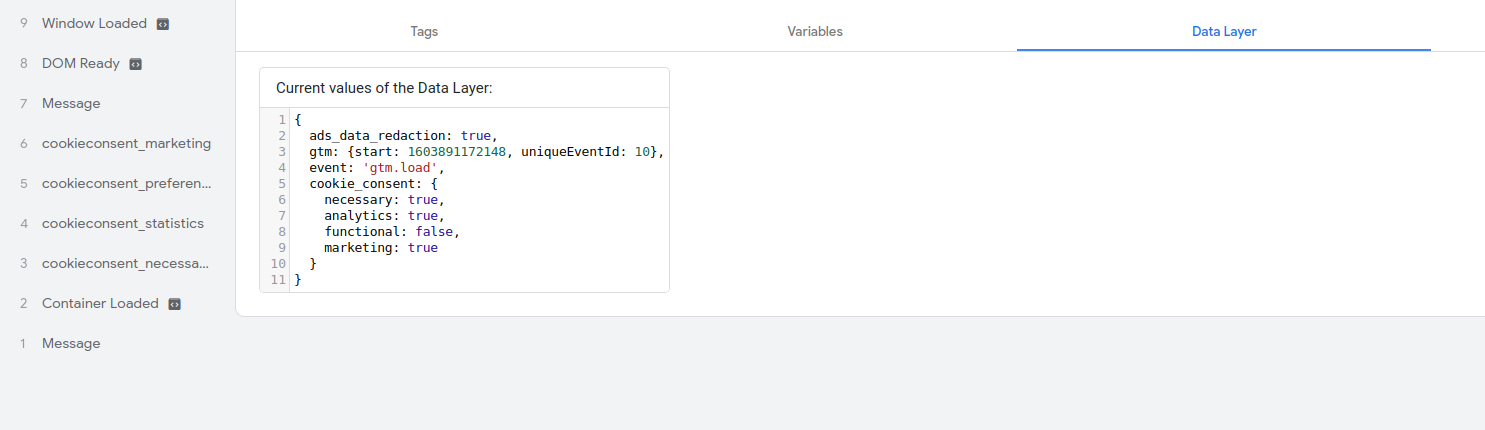
The current status can also be read via the DataLayer. The following variables are available within the data layer:
cookie_consent.necessary
cookie_consent.analytics
cookie_consent.functional
cookie_consent.marketing
To read out a variable, select the menu option Variables in Google Tag Manager. Press new. Give the variable a logical name for example. CookieConsent.io – Marketing DataLayer variable.

Then choose at Variable Type for Data Layer variable. Enter at the value e.g. cookie_consent.marketing. Then press Save.

Next, within Google Tag Manager, click the Triggers button and then the “New” button.
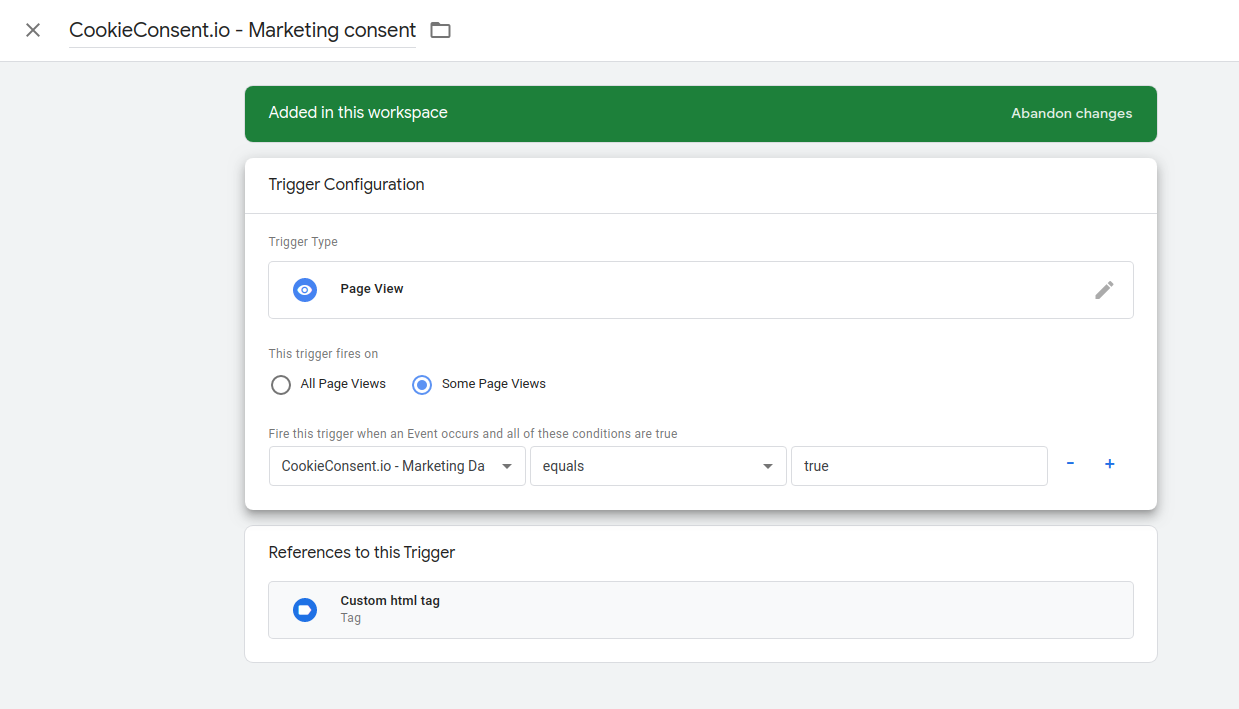
Enter a title for the event (e.g. CookieConsent.io – Marketing consent). Choose as trigger type “Page view” and indicate that the trigger is only fired on some pages. At event choose the CookieConsent.io – Marketing DataLayer variable. Specify that the value must be equal to true.
Then press the save button. Then click on the Tags button and choose new tag.
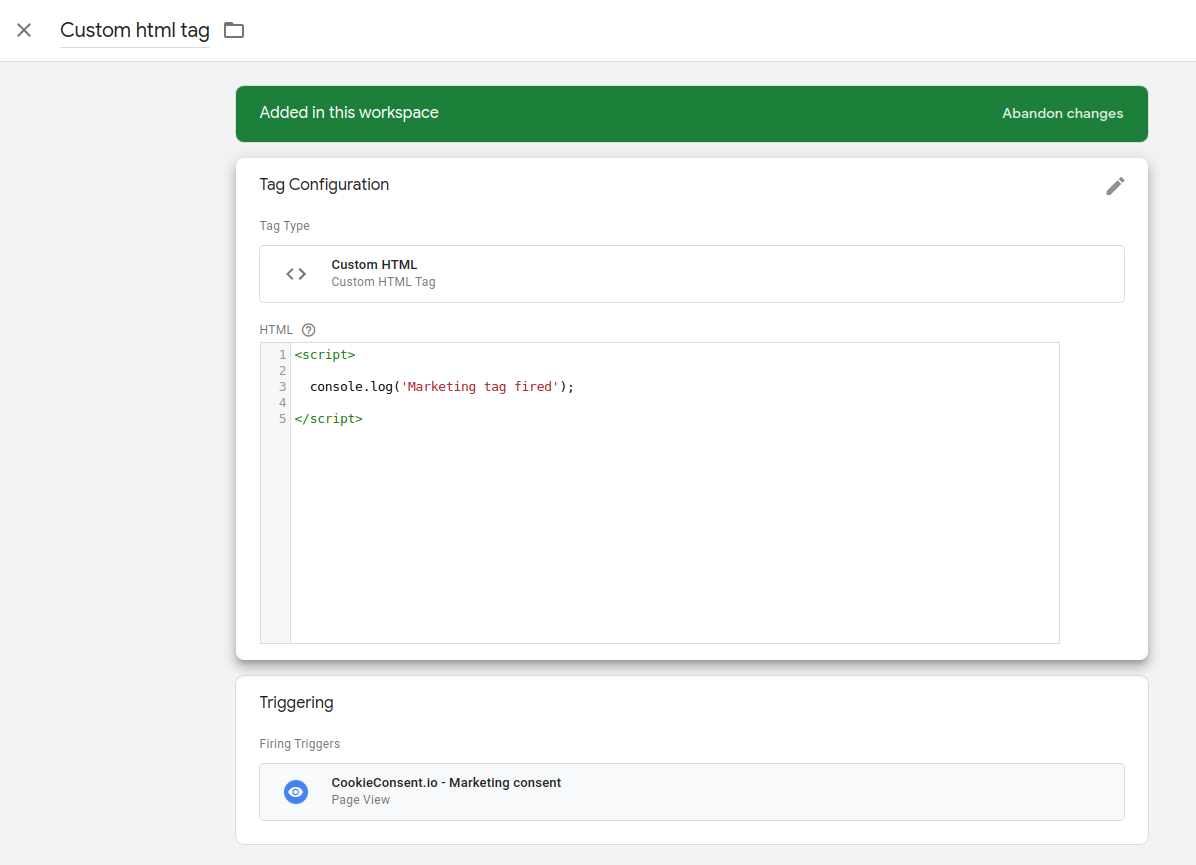
As an example we make a custom HTML tag. This tag will show the message “Fired when marketing consent is given” as soon as you have agreed to place marketing cookies. At Triggering, choose the trigger “CookieConsent.io – Marketing consent”.
Then press Save. You have now created an HTML tag that will be displayed as soon as the visitor agrees to the placement of Marketing cookies.
Google Tag Manager Consent State variable
To request the current status of the CookieConsent you can use the consent status variable. To do this, click the Variables option in the menu and click “New”.

Then press the “Explore More Tag Types in the Community Template Gallery” button.
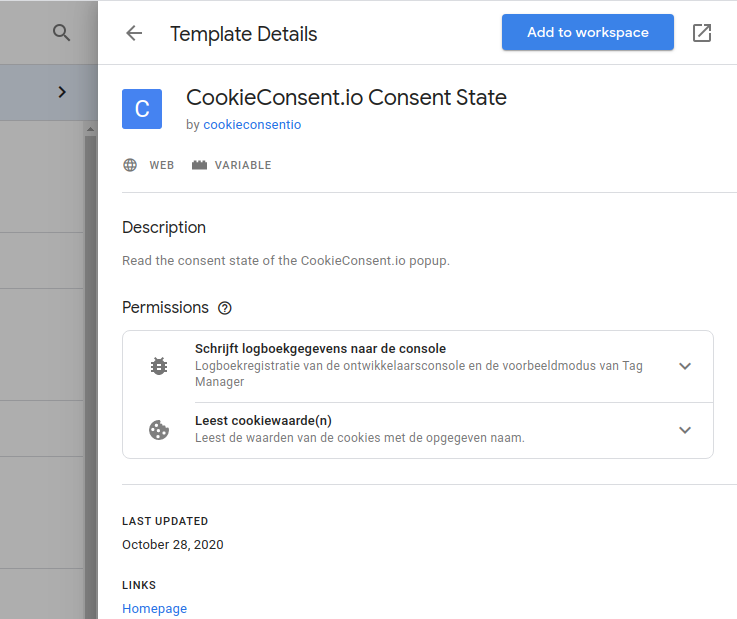
Then search for “cookieconsent.io”. Select CookieConsent.io and click “Add to Workspace”. Give the variable a logical name (e.g. CookieConsent.io Consent state). Press save.
Then click on the Triggers button within Google Tag Manager and then on the “New” button.
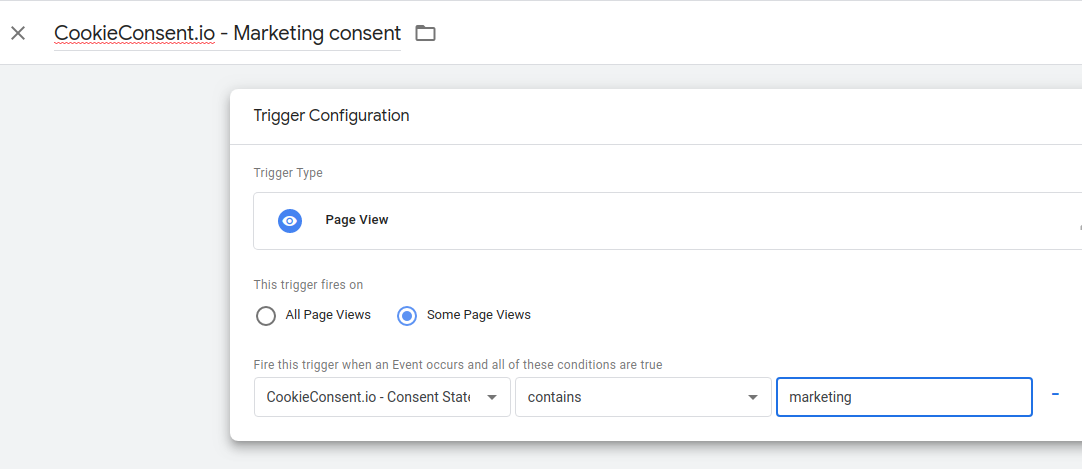
Enter a title for the event (e.g. CookieConsent.io – Marketing consent). Choose “Page view” as trigger type and indicate that the trigger is only fired on some pages. Then choose the CookieConsent.io Consent Status variable at event. Indicate that the value must contain marketing. You can choose from the following values:
necessary
analytics
functional
marketing
Then press the save button. Then click on the Tags button and choose new tag.
As an example we make a custom HTML tag. This tag will display the message “Fired when marketing consent is given” as soon as one has agreed to place marketing cookies. At Triggering, choose the trigger “CookieConsent.io – Marketing consent”. Then press Save. You have now created an HTML tag that will be displayed as soon as the visitor agrees to place Marketing cookies.
Google Tag Manager Events
You can use events within Google Tag Manager to activate various types of tags. To do this, click on the Triggers button within Google Tag Manager and then on the ‘New’ know.
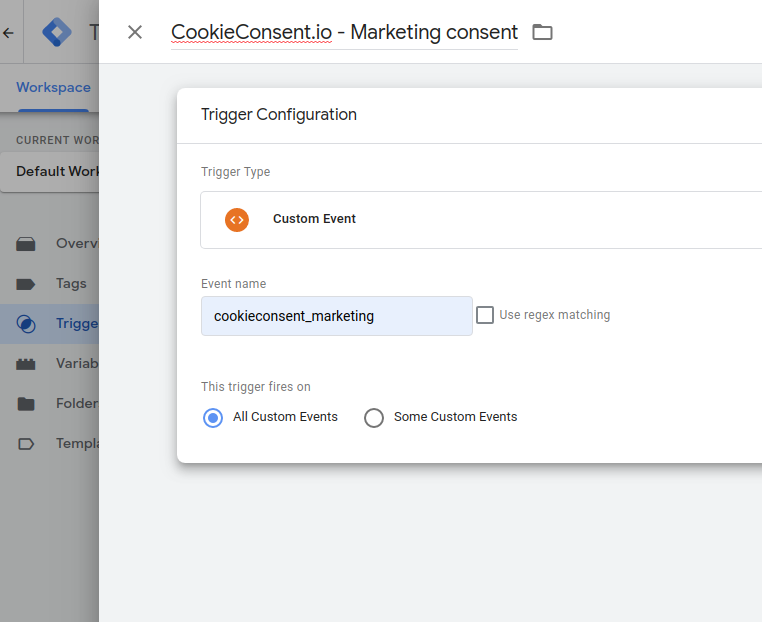
Enter a title for the event (e.g. CookieConsent.io – Marketing Event). Choose as trigger type ‘Custom event’. Enter ‘cookieconsent_marketing’ at Event name. This trigger may be fired at all custom events.

Then click on the Tags button and choose new tag.

As an example we make a custom HTML tag. This tag will display the message ‘Fired when marketing consent is given’ as soon as one has agreed to the placement of marketing cookies. At Triggering, choose the trigger ‘CookieConsent.io – Marketing Event’.
Then press Save. You have now created an HTML tag that will be displayed as soon as the visitor agrees to the placement of Marketing cookies.
You can create triggers for the following events in a similar way:
- CookieConsentInitialize (always with initialization)
- CookieConsentSaved (when saving)
- CookieConsentAllowAllButtonClicked(allow all button clicked)
- CookieConsentCookieSettingsButtonClicked (settings button clicked)
- CookieConsentWhatAreCookiesButtonClicked (what are cookies button clicked)
- CookieConsentSaveSettingsButtonClicked (save settings button clicked)
- cookieconsent_necessary (necessary cookies may be processed)
- cookieconsent_statistics (analytics cookies may be processed)
- cookieconsent_functional (functional cookies may be processed)
- cookieconsent_marketing (marketing cookies may be processed)
Google Tag Manager Import Basic Structure
A basic template is available to quickly import the above variables, triggers and tags into your container. You can download this container template here.
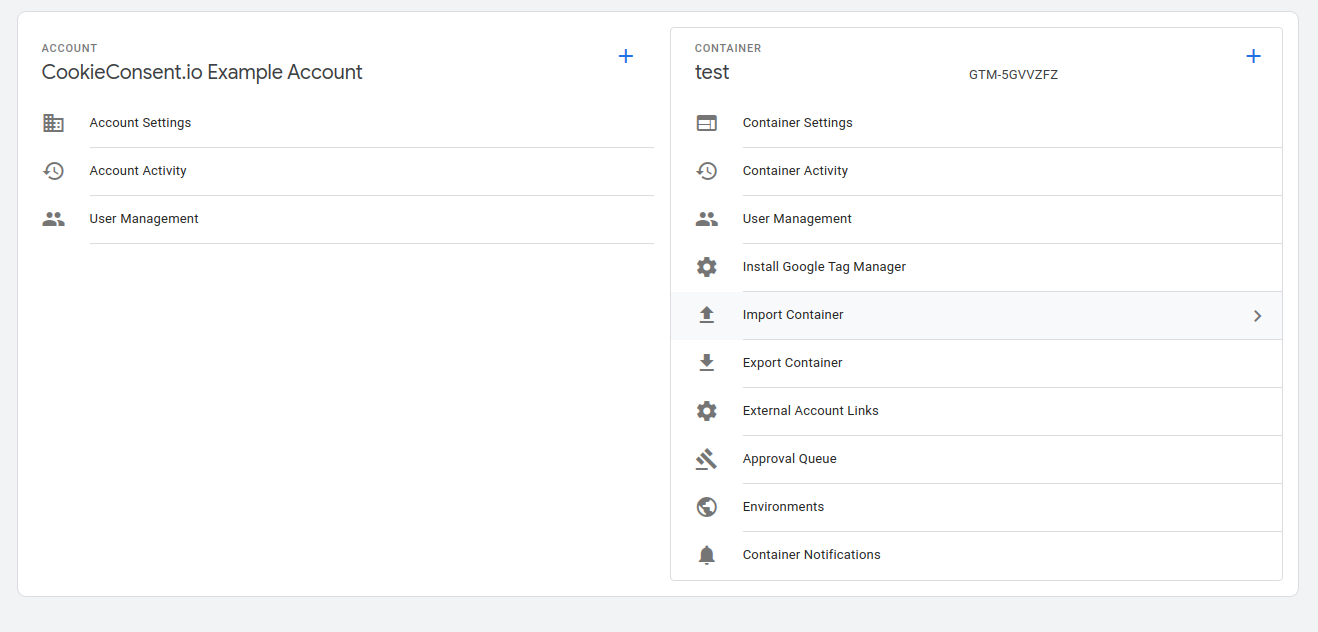
You can then integrate this template into your own container. To do this, go to ‘Admin’ in Google Tag Manager and click on the Import Container button.
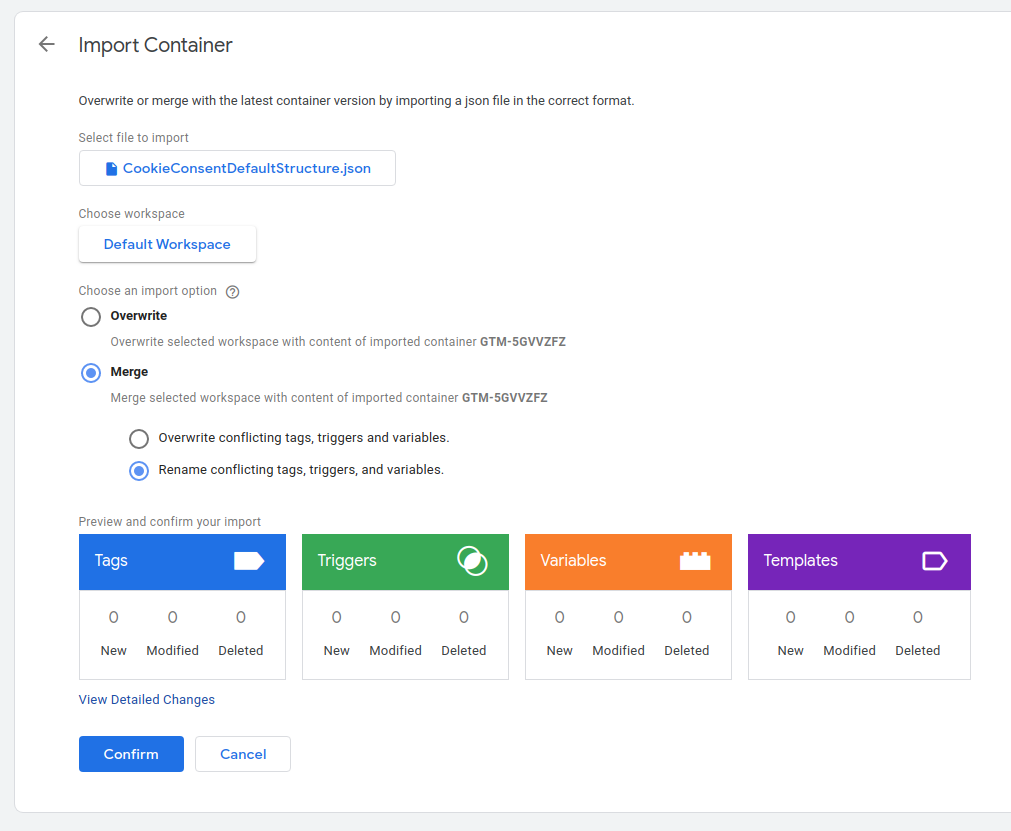
Select the container file you just downloaded. Choose the option merge and select the option ‘Rename conflicting tags, triggers and variables. Then click on confirm to implement all changes.
Change layout
To change the layout, you can add the CSS below to your style sheets. These are of course examples and can be adjusted as you see fit.
/* Change paragraph font size */
.cookie-consent-io-cookie-bar p {
  font-size: 12px !important;
}

/* Change button font size */
.cookie-consent-io-cookie-bar button {
   font-size: 12px !important;
}

/* Selection label font size */
.cookie-consent-io-option .infotext {
   font-size: 12px !important;
}

/* Change all titles */
.cookie-consent-io-cookie-bar h3 {
   font-size: 14px !important;
}

/* Main title */
.cookie-consent-io-cookie-bar h3.cookie-consent-io-title {
   font-size: 18px !important;
}

/* Change the background to blue */
#cookie-consent-shadow-bg {
   background-color: rgba(105,105,105,0.9) !important;
}

/* No background */
#cookie-consent-shadow-bg {
   background: transparent !important;
}

/* Add a logo on top of the window */
.cookie-consent-io-primary-logo, .cookie-consent-io-secondary-logo, .cookie-consent-io-tertiary-logo {
   width: 157px;
   height: 44px;
   background: url('https://edge.cookieconsent.io/prod/images/powered-by.png');
   background-size: contain;
   margin: 0 0 20px 0;
}

/* Change accept button to a blue color */
.cookie-consent-approve-all {
   background-color: #1a0dab !important;
}

/* Change cookie settings button to a green color */
.cookie-consent-cookie-settings {
   background-color: #228B22 !important;
}

/* Change more information to a yellow color */
.cookie-more-information-button {
   background-color: #FFFF00 !important;
   color: #000 !important;
}

/* Save settings in a blue color */
.cookie-consent-save-settings {
   background-color: #1a0dab !important;
}

/* Blue sliders */
.cookie-consent-io-slider {
   background-color: #1a0dab !important;
}

/* Grey pill in slider */
.cookie-consent-io-slider:before {
   background-color: grey !important;
}

/* Change size of center popup */
#cookie-consent-cookie-bar-center {
   width: 600px !important;
   height: 500px !important;
}

/* Change height op top popup */
#cookie-consent-cookie-bar-top {
   height: 400px !important;
}

/* Change height of bottom popup */
#cookie-consent-cookie-bar-bottom {
   height: 400px !important;
}

/* Change cookie table color */
#cookie-io-table th {
   background-color: black !important;
}

/* Change cookie table row color */
#cookie-io-table tr:nth-child(even) {
   background-color: #f2f2f2;
}
Javascript events
There are 6 available events that you can listen to via javascript. That way, you can take into account the form of consent given in your own scripts:
- CookieConsentInitialize (always with initialization)
- CookieConsentSaved (when saving)
- CookieConsentAllowAllButtonClicked(allow all button clicked)
- CookieConsentCookieSettingsButtonClicked (settings button clicked)
- CookieConsentWhatAreCookiesButtonClicked (what are cookies button clicked)
- CookieConsentSaveSettingsButtonClicked (save settings button clicked)
- cookieconsent_necessary (necessary cookies may be processed)
- cookieconsent_statistics (analytics cookies may be processed)
- cookieconsent_functional (functional cookies may be processed)
- cookieconsent_marketing (marketing cookies may be processed)
<script type="text/javascript">
   document.addEventListener('CookieConsentInitialize', function(event) {
      console.log('init', event);
   }, false);

   document.addEventListener('CookieConsentSaved', function(event) {
      console.log('save', event);
   }, false);

   document.addEventListener('CookieConsentAllowAllButtonClicked', function(event) {
      console.log('Cookie consent allow all', event);
   }, false);

   document.addEventListener('CookieConsentCookieSettingsButtonClicked', function(event) {
      console.log('Cookie settings button clicked', event);
   }, false);

   document.addEventListener('CookieConsentWhatAreCookiesButtonClicked', function(event) {
      console.log('What are cookies button clicked', event);
   }, false);

   document.addEventListener('CookieConsentSaveSettingsButtonClicked', function(event) {
      console.log('Save settings button clicked', event);
   }, false);

   document.addEventListener('cookieconsent_necessary', function(event) {
      console.log('cookieconsent_necessary', event);
   }, false);

   document.addEventListener('cookieconsent_statistics', function(event) {
      console.log('cookieconsent_statistics', event);
   }, false);

   document.addEventListener('cookieconsent_functional', function(event) {
      console.log('cookieconsent_functional', event);
   }, false);

   document.addEventListener('cookieconsent_marketing', function(event) {
      console.log('cookieconsent_marketing', event);
   }, false);
</script>
Scripts
Load scripts based on CookieConsent settings
As soon as a visitor saves the CookieConsent settings or has already made a choice, scripts with the relevant settings are loaded.
Available data-cookieconsent values: analytics, marketing, functional, necessary.
Note that the script type is “text/plain”.
<script type="text/plain" data-cookieconsent="marketing" src="script.js"></script>Iframes
Load iframes based on CookieConsent settings
As soon as a visitor saves the CookieConsent settings or has already made a choice, iframes with the relevant settings are loaded.
Available data-cookieconsent values: analytics, marketing, functional, necessary.
Note that “src” has been replaced with “data-src”.
<iframe data-src="iframe.html" data-cookieconsent="marketing"></iframe>You can embed YouTube video after consent with the code snippet below:
<iframe data-src="https://www.youtube.com/embed/Hp_Eg8NMfT0" data-cookieconsent="marketing"></iframe>
<p>Please <a href="javascript:cookieConsent.showCookieConsentSettings();">accept marketing-cookies</a> to watch this video.
<a href="javascript:cookieConsent.showCookieConsentSettings();">Change your consent</a>
</p>
CSS classes
Show or hide elements based on CookieConsent settings
As soon as a visitor saves the CookieConsent settings or has already made a choice, elements with the relevant CSS classes are shown or hidden.
<div class="cookieconsent-optin">
   This element is displayed when at least one choice is selected
</div>

<div class="cookieconsent-optout">
   This element is displayed when no selection is selected
</div>

<div class="cookieconsent-optin-marketing">
   This element is displayed when marketing is selected
</div>

<div class="cookieconsent-optout-marketing">
   This element is displayed when marketing is not selected
</div>

<div class="cookieconsent-optin-analytics">
   This element is displayed when analytics is selected
</div>

<div class="cookieconsent-optout-analytics">
   This element is displayed when analytics is not selected
</div>
Cookie settings
CookieConsent settings view/adjust
Via a link:
<a href="javascript:cookieConsent.showCookieConsentSettings();">
   Cookie settings
</a>
Via Javascript:
<script type="text/javascript">
    if(typeof window.cookieConsent === 'undefined') {
        document.addEventListener('CookieConsentInitialize', function () {
             cookieConsent.showCookieConsentSettings();
        });
    }
    else {
        cookieConsent.showCookieConsentSettings();
    }
</script>
Cookie information
Show cookie information
<div data-cookieconsent-parent="cookie-consent-io-cookie-data-info">
   <script type="text/javascript" id="cookie-consent-io-cookie-data-info">
      function showCookieInfo(scriptElement, cookieConsent) {
         scriptElement.parentNode.appendChild(cookieConsent.getCookieInformation());
      }

    var scriptElement = document.getElementById('cookie-consent-io-cookie-data-info');
    if(typeof window.cookieConsent === 'undefined') {
        document.addEventListener('CookieConsentInitialize', function () {
            showCookieInfo(scriptElement, window.cookieConsent);
        });
    }
    else {
        showCookieInfo(scriptElement, window.cookieConsent);
    }
   </script>
</div>
Cookie table
Show cookie table
<div data-cookieconsent-parent="cookie-consent-io-cookie-data-table">
   <script type="text/javascript" id="cookie-consent-io-cookie-data-table">
      function showCookieTable(scriptElement, cookieConsent) {
         scriptElement.parentNode.appendChild(cookieConsent.getCookieTable());
      }

      var scriptElement = document.getElementById('cookie-consent-io-cookie-data-table');

      if(typeof window.cookieConsent === 'undefined') {
         document.addEventListener('CookieConsentInitialize', function () {
           showCookieTable(scriptElement, window.cookieConsent);
         });
      } else {
         showCookieTable(scriptElement, window.cookieConsent);
      }
   </script>
</div>
WordPress plugin
Download our official WordPress plugin with the link below:
https://wordpress.org/plugins/cookieconsent-io/
After installation of the plugin you can use the following short codes for adding functionality to your WordPress website:
SHOW LEGAL TEXT:
[cookie-consent-io-description]

SHOW DISCOVERED COOKIE TABLE
[cookie-consent-io-table]

SHOW COOKIE SETTINGS (LINK)
[cookie-consent-io-settings type=”link”]Show CookieConsent.io settings[/cookie-consent-io-settings]

SHOW COOKIE SETTINGS (BUTTON)
[cookie-consent-io-settings type=”button”]Show CookieConsent.io settings[/cookie-consent-io-settings]

FILTERS
The following filters are available:

render_cookie_consent_io_description
render_cookie_consent_io_table
render_cookie_consent_io_settings
Magento 2 Plugin
Step 1
Download our free Magento 2 plugin with the link below:
https://marketplace.magento.com/abovo-cookie-consent-io.html
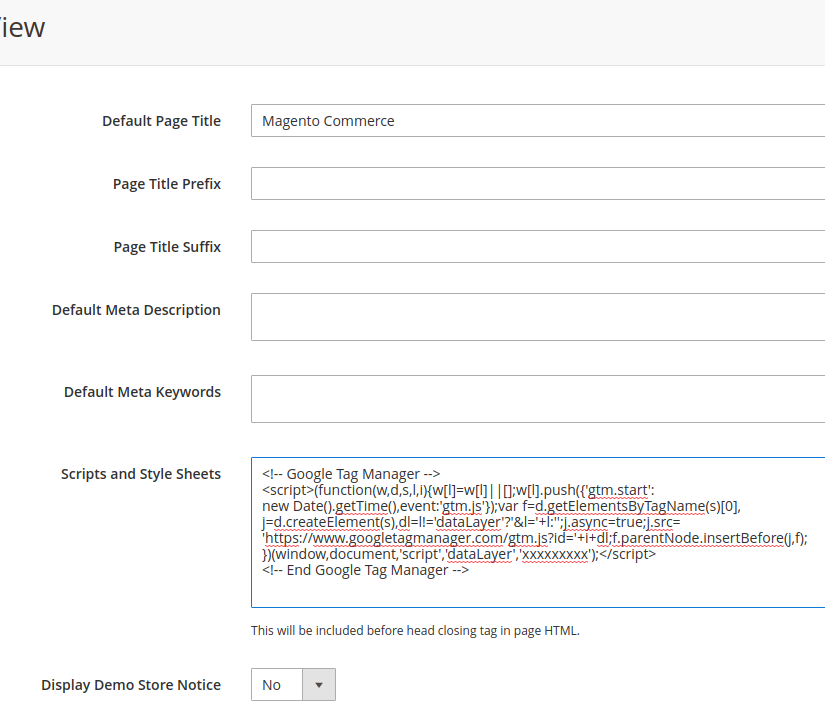
Please add the GTM container script to the head of the Magento 2 design. Please select Content > Design > Configuration from the Magento 2 admin and edit the active design configuration. Select HTML head and insert the Google Tag Manager installation script and press Save Configuration.
Step 2
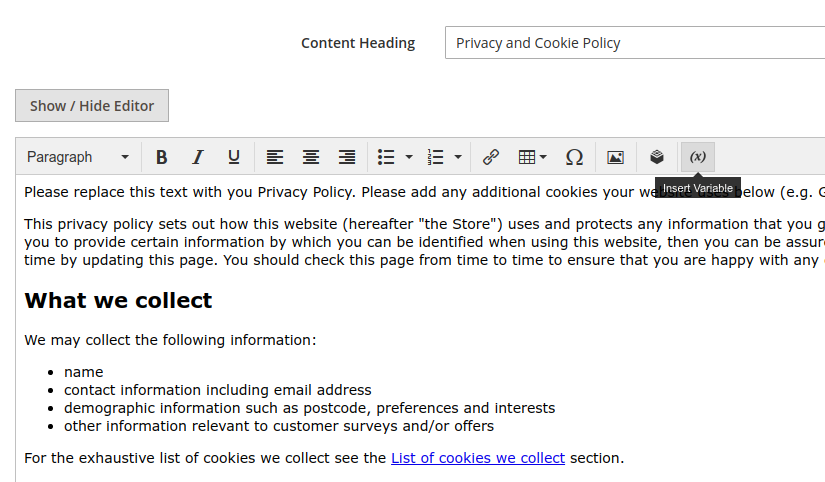
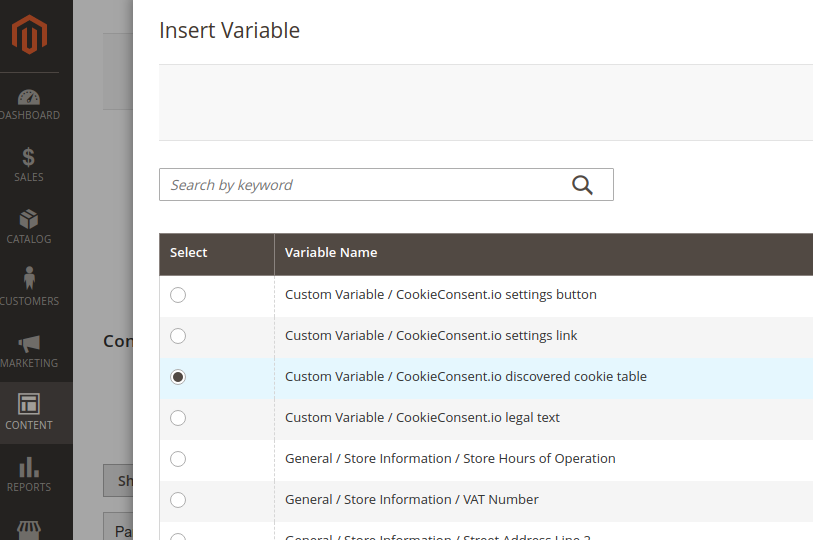
Select the privacy page and add the legal text, cookie table and cookie settings link. You can add these features by selecting the Custom Variables option.
Step 3
Please select System > Cache management and make sure you clear the Layouts, Blocks HTML output and Page Cache.

Step 4
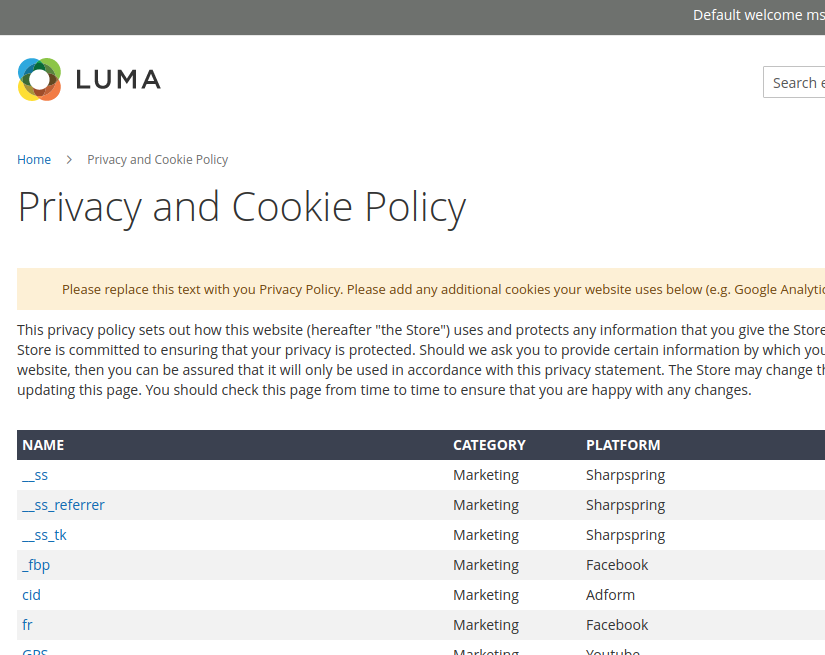
View the privacy page and check if all the components are shown.
Wix integrations

Cookieconsent.io can be integrated into your Wix website through Google Tag Manager. To integrate it all, you only need your Google Tag Manager ID. You can copy this ID from the Google Tag Manager Workspace overview in the top right corner.
Then choose “Marketing integrations” in your Wix dashboard. And click the connect button at the Google Tag Manager option.
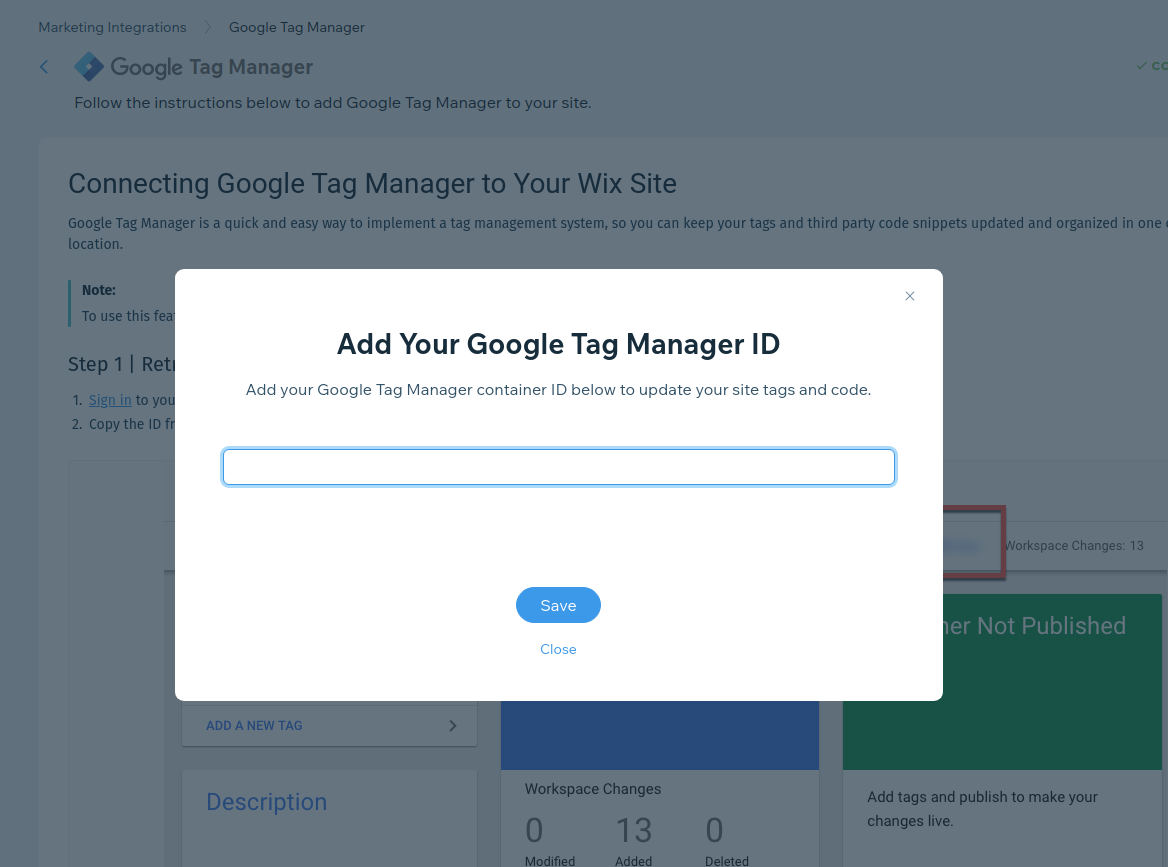
Enter your Google Tag Manager ID and click the Save button.
Google Consent Mode
Consent mode allows you to adjust how your Google tags behave based on the consent status of your users. You can indicate whether consent has been granted for analytics and ads cookies.
To implement Google Consent Mode you can enable this feature in Google Tag Manager:
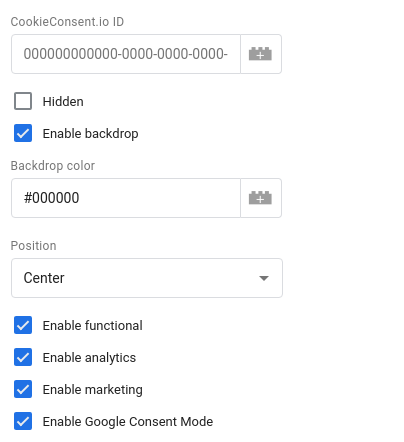
Then make sure you add the following code before the GTM script tag. This should be in the <head> tag of the page. Google’s tags will dynamically adapt, only utilizing cookies for the specified purposes when consent has been given by the user.
<script type="text/javascript">
   window.dataLayer = window.dataLayer || [];
   function gtag(){dataLayer.push(arguments);}

   gtag('consent', 'default', {
      'ad_storage': 'denied',
      'analytics_storage': 'denied',
      'wait_for_update': 2000
   });

   gtag('set', 'ads_data_redaction', true);
</script>
Track opt-in ratios in Google Analytics
If you use Google Tag Manager you can easily analyze the opt-in ratios within Google Analytics. To start, create the following trigger within Google Tag Manager:
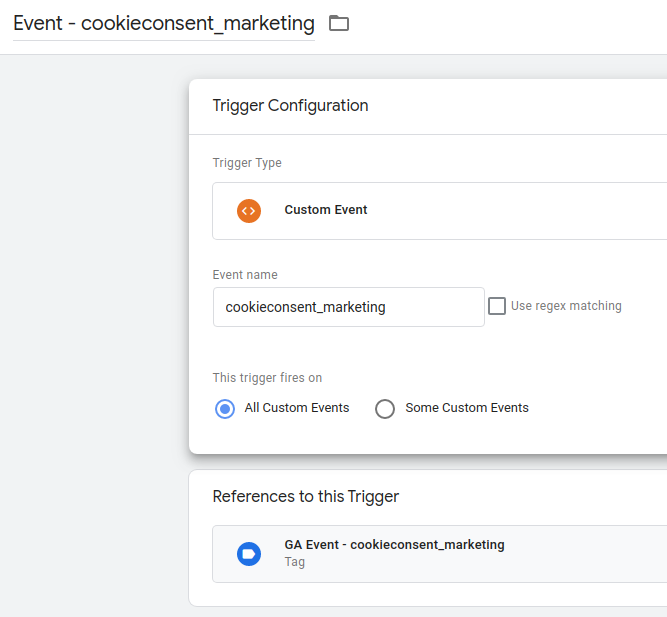
Repeat this process for the following events:
cookieconsent_necessary
cookieconsent_statistics
cookieconsent_functional
cookieconsent_marketing
Then create the following tag for each event above:
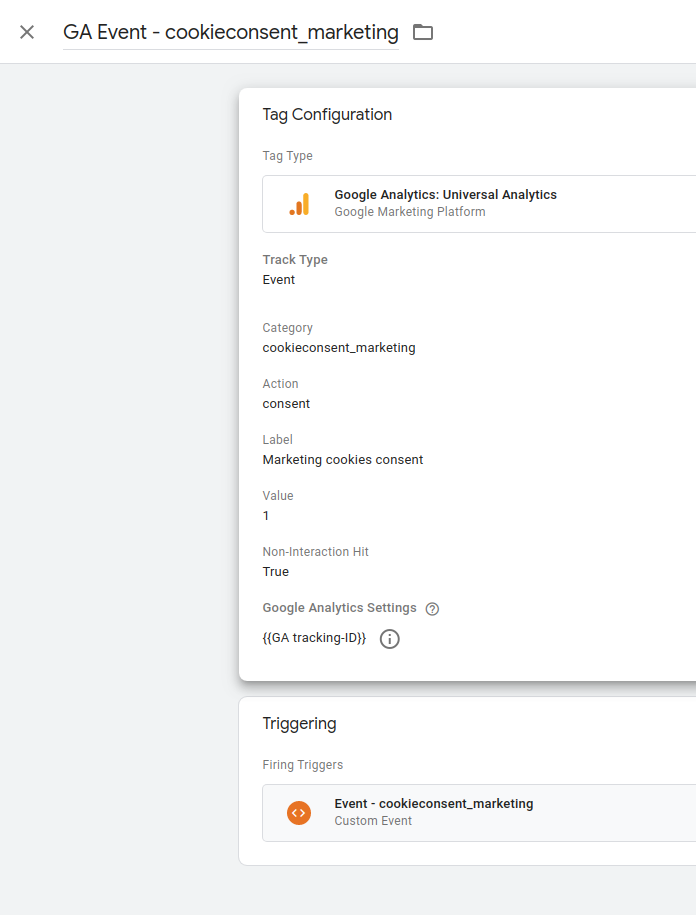
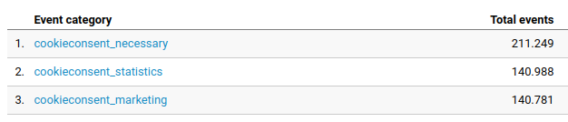
Once the container is published, you will see all opt-in events coming into Google Analytics.
To do this, click on the Behavior > Events > Overview option.
Facebook Server2Server import basic structure
A basic template is available to quickly import the above variables, triggers and tags into your container. You can download this container template here.
You can then integrate this template into your own container. To do this, go to ‘Admin’ in Google Tag Manager and click on the Import Container button.
Select the container file you just downloaded. Choose the option merge and select the option ‘Rename conflicting tags, triggers and variables. Then click on confirm to implement all changes.